Returning from a break…

As you can tell by the last post, it’s been a while since I last posted something here. Life’s been keeping me busy and because of that I’ve had to bench my raiding and wow time in general. 

That said, I am quite excited about Warlords of Draenor. I’m not 100% sure yet about the proposed monk changes, especially concerning Mistweaver. Some of the stuff they’re adding/removing/changing is really awesome, but some of the other stuff is downright dissapointing.

I’ll try and write a bit more about my thoughts and expectations concerning the new expansion. For now I just wanted to let you guys know, I’m sort of back in wow and will write some more again 😉

Better Healing 2: UI and UX

To be able to heal, you need information about what is happening. Part of this we receive from the game itself, other parts are often better served via third party add-ons. These, together with the basic elements given by the game, is what makes up our User Interface (UI). As the information presented will allow you to do your job, it’s not a weird concept to think that a good UI will improve your healing. Welcome to part 2 of Better Healing: UI and UX.

UI stands for User Interface, but you might be less familiar with UX, or User eXperience. Where the interface deals with what information is presented and where it is presented, the experience deals with how optimal that information is presented. That may seem as a simple difference, but in performing your role as a healer it becomes a massive one. What might look good or pretty, may still not be the best way to present such information. For example a bar that has the exact same color as your other bars may give an esthetically pleasant look and feel, but will not be so noticably in the thick of a boss fight. In oversimplified terms, UI is about the pretty, UX is about the usefull.

Please note that this article is not going to discuss which add-ons you should use or could use. There’s a ton of them out there and they all serve some use, depending on your class, playstyle or personal preference. Furthermore, add-ons come and go. The basics of a good UI and UX are timeless and thus much more important.


INFORMATION OVERLOAD

So what makes a good UI and UX? First of there is the amount of information that is presented. Us healers like to know what’s going on, but therein lies the risk of knowing too much. Our brains can only handle so much information input at a time and seeing as modern raids are complex, time-based and require a lot of actions and movements, the risk of getting an information overload is high. Overload of infomation leads to that moment of panic, your eyes running around the screen, not knowing where to look or what to do. And in the mean time your raid dies… not what we want.

So we have to ask ourselves, what do I _need_? What is the essential information I require to raid with without going into an overload? Luckily that’s a quite easy one to figure out for us healers. We need:

  • To see our environment. You will do 0 healing if you die in a fire.
  • Raidframes. Who needs them healz?
  • Buffs and debuffs, on both yourself and others!

The rest then becomes personal preference. Whether you want to see cooldowns, buffs or spells from other healers. Perhaps you want to see big cooldowns from other healers or to see how much healing is incoming on people. Things that can lead to better gameplay, but is not necessary. This is a fine line to walk as it’s easy to succumb to many addons simply as they might seem useful.

So how do you make sure you don’t get that information overload? Well it’s quite simple really. Log in on an off-night. Disable all your addons and hop into a LFR. Notice anything you find truly lacking? Having issues that seem to make things unplayable? Enable the ones you miss the most and repeat. This should give you a good clue as to what you truly need and what is simply wasted information.

Need a much simpler answer? Ok. You don’t need any addons. The Blizzard UI is efficient in everything you need to raid with and it’s one I’ve been raiding with since Malkorok came along and I didn’t have time to sort the shields on Vuhdo or Grid. Although a lot of healers will gasp now and call me nuts, the basic raidframes are actually really good now. Yes they have been bad, but they’re not anymore. Anything you add to your basic ui should improve your gameplay. Anything you add should directly improve your role as a healer (see part 1). If it’s just pretty or extra information, you should seriously consider removing or disabling it for raids.


PLAYSTYLE

Lastly I want to touch upon healing playstyle. Whereas tanks and dps have a quite fixed way of pressing their buttons to some extend, us healers tend to heal in three possible ways. Or well four to be exact, but if you’re still clicking targets and then clicking spells, you should really get with the program. Keyboardturning is also bad mmmkay?


1. Clique

This addon got quite popular in Vanilla and has been a healer favorite for some time. It’s also part of the functionality of Vuhdo, which is another favorite. The idea is that you bind mouseclicks to healing spells, making your healing a true wack-a-mole game.
PROS: Mousebuttons are quick and often easier to remember. This can serve as a quick learning curve and can be quite quick if you have mutliple mousebuttons
CONS: Modern raids have more spells than you have buttons unless you have a 15+ gaming mouse. This often results in having to combine keys to your mouse, making it very slow. Most people will for example press shift first and then click, making it a two-step proces.


2. Click to target and keybinded spells

This playstyle is what many PvE players would frown upon, but it’s most popular amongst PvP players. It functions with a lot of macro’s to be able to quick target (for example: 1 = shield on tank 1, button 2 = shield on tank 2). Singletarget heals are done by clicking on the target and pressing the button needed. Although this might seem as slow as a shift-clique, it is slightly quicker in reality. As the mouse and keybind are separate, one can target one person, spam the heal and as you do move the mouse to target the next.
PROS: Most mobile setup. Due to macro’s and targetting you can keep your mouse free for moving and turning.
CONS: If you need to retarget a lot, this obviously does not work as well. Requires you to change macros if tanks change.


3. Mouseover macros

The most common form of healing amongst most healers that I know. The idea is that you hover your mouse over a raidframe, then press keybinds to activate spells. This allows you to move your mouse the moment you press your key, giving a very quick way of healing that shines especially well if you need to target many people in a short period of time.
This does require you to make macros for all of your healing spells, which can be a little intimidating if you don’t know much about macros.

PROS: Quickest way of healing in a static fight.
CONS: Due to mouseover needed, harder to play on the move.


4. Environmental

Ok I said three ways, but I have to add this one. It’s not one you’ll see a lot and it’s definitely not viable as a main healing style, but I want to add it nonetheless. This style of play revolves around seeing what is going on in the raid. This is only viable for healing spells that need to be placed, like Healing Rain or Healing Spheres and the likes.The reason that I’m placing it here is because it requires a different way of healing that is separate from looking at raidframes. Most of the time this is an addition to your healing style as you’ll have to combine both.

The only possible class that might actually pull this off completely is a weird setup of a mistweaver monk who has the Surging Mist glyp and uses Healing Spheres to spotheal, much like most arena monks are already doing. Definitely not ideal in a 25man raid setting however, but added to be complete.

PROS: better placement of spells can boost healing
CONS: singletarget heals are almost impossible to get off properly.

 
So which is the better? It depends on your playstyle, your class and what you are doing. None of the above mentioned styles are perfect. They shine in different situations. That said, I want to point one thing out. Addons come and go and patches always screw with those addons. Relying on a clicking system like Clique and Vuhdo is going to give you issues at times. If the developers of these addons chose to stop working on them you will have to rework your healing style completely. That’s a big risk you’re running with in my opinion.

It is why I would suggest going with either option 2 or 3 as they provide more speed and movement, do not rely on addons and will always be available in the game. Even if your pc crashes, you grab a new one and want to raid the moment the game is downloaded.

In the end, you need to make sure your UI and UX suits your healingstyle. What works for other healers might not work for you. Being able to clear everything now and then and re-evaluate the use of your addons is a must in my opinion to improve your healing. In the end you need to improve, not download a better addon 😉

Better Healing 1 : Changing your mindset

As we play games and MMO’s in particular, we want to improve. We want our gear to get better, our toon to become stronger and hopefully also improve our own skills as a player. There are a ton of ways to achieve this, ranging from the very obvious to the subtle. In this series on improving your performance as a healer, I want to touch upon the things I think are often forgotten. To start, let’s focus on the mindset of a healer.

If you feel that your job as a healer is to “heal the raid” then you have a very simplistic view on your role. By this description it would be quite ok to bring 20 healers to a raid and play it safe, but we all know this wouldn’t be a great idea. Most raids prefer to run with the minimum amount of healers needed, even going as far as risking the occasional death of a dps just to min/max output. That then, should give you a better idea of our role. We’re present to maximize the output of our raid. Seeing as damage taken and the resulting deaths are one of the biggest elements hindering a raid, this means a big chunk of your job will be healing, but not just healing alone.

Naturally if we’re focusing on managing incoming damage, then having no damage come in would be the best way to go, right? That means that helping your raid to perform well should have a high priority. Dispelling nasty debuffs for example, or throwing utility around to soak, free, grant immunities or whatever specific utility your class has. Having that dps be able to move out of the fire quickly is much more efficient than healing all the damage he’s taking!

It’s a shame not many PvE players hop into an arena now and then, as this is a fine school to learn this lesson. Every healer that has done some PvP knows that you will spend every moment you’re not healing trying to dispel, purge, interrupt, position, cc and anticipate the tactics of your opponents. Something that isn’t needed as often in PvE. But something that you should be trying to keep an eye out for anyway. There is a big chance or even a risk in PvE to sit back and ‘just’ heal. To let dps do the interrupts, let the tanks worry about their own cooldowns, in short: be lazy.

Being lazy is the opposite of improving of course, lazy healers will get stuck in their ways and might even get bored quicker. Lazy healers also react much later and have little overview of the fight. By being in tune with everything that goes around, you’ll be able to anticipate the damage incoming much better and be a vital part of your raid. Plus, it’s much more fun!

Which brings me to a personal view I know not everyone agrees with, but let me put it on the table nonetheless: Healers are the backbone of your raid. They are more important than your tanks and much more important than your dps. Now that we’ve lost all tanks and dps reading this article ( 😀 ), let’s discuss why this is. On progression fights – and let’s be honest, who cares about farmfights? – you first need to learn a fight. Dps will hold back a bit in order to make sure they don’t stand in everything and tanks need to keep an eye out for when to pop cooldowns and what adds to pick up or taunt. Yet for us healers, there’s little rest. As more people will stand in things or pop cooldowns too late as they learn the fight, we’re in fact working harder than we would on farmnights!

Healers need to bring their a-game to a progression fight all the time. There is no room to take it easy to learn the mechanics as people will still take damage. This is part of the reason why most healers play a healer, but it also places us in an interesting position. A position of responsibility, a position as the foundation of which the success of your raid rests.

If we don’t bring our A-game, the raid wipes. It’s that simple.

Spirit in WoD. Tea for everyone?

The topic of spirit was very briefly discussed at Blizzconn and I’ve been reading and hearing rumors all over the web about changes coming. Changes that might resemble the way Mistweavers handle their mana. At last, this seems to be confirmed. Healers won’t be using Spirit much next patch. Or at the very least, will need a lot less spirit for mana regen.

Blue Post: [link]

Secondary stats on armor pieces will also no longer include Spirit, nor will they include Bonus Armor, which are reserved exclusively for non-armor pieces (rings, trinkets, etc.).

In the case of Spirit, imagine that stacking Spirit on every non-armor slot will give you more mana regeneration than you would reasonably need. That is to say, you likely won’t need Spirit on every single spot in order to function as a healer.

This does of course bring up the question where we will be getting our mana regen from? Is it going to be simply that a small bit of spirit will give insane amounts of mana or are we going for an active mana management system? Blizzard have said numerously that they feel the monks Manatea is a very effective way of mana generation (and to be fair, it is). Could it be that we’ll see this be implemented in more healing classes?

The foundation is already there. Druids have their Innervate, Paladins have Divine Plea, Priests have their little Shadow Fiend and of course Shamans have always used Water Shield for their personal regen. In most cases this could be a simple point of adding stacks and lowering or removing a cooldown to match monk mana regen.

It will be very interesting to see which way this will play out…

Mistweaver: The Proven Healer [Guide]

To kick things off, let me write a little guide for one of my favorite additions to the game since the last patch: Proving Grounds. A fun and challenging solo experience. Something that was quite lacking from a game like World of Warcraft, I think. This guide is intended to help those who might be a little stuck or are just wanting to start this, perhaps even on their monk alt. Although this is of course monk orientated, I hope it has some pointers for other healers as well. Anyho, let’s get started.

THE TEAM

WoWScrnShot_112613_175325

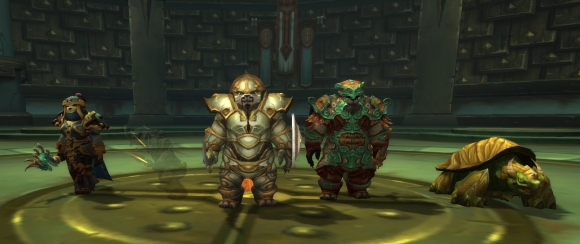
Before we get into the nitty gritty, let’s meet your team. The 4 party members that will make your life a nightmare and will have you screaming behind your computer. First off there’s Oto the Protector. You guessed it, he’s your tank. He’s a warrior with a shield wall and a stun. He’s quite decent to be fair, but has some issues with positioning. You’ll often see him run around for no apparant reason.

Then there is our rogue: Ki the Assassin. She has a shadowstep to get to mobs quickly and she is first on the interrupt rotation. She’s actually one of the better players in your group, which is saying a lot. Another dps is our hunter: Sooli the Survivalist. He likes to stay at max range whenever possible. That means that if there’s any fire in the middle, you might find him at the complete opposite of the room, so keep that in mind. You’ll have to look around now and then to find your hunter hiding in some dark corner…

And lastly, the horrible mage: Kavan the Arcanist. She tends to run into melee range at the wrong times (I NEED TO ARCANE EXPLOODDEEE!), stand in fires, be out of range. Big sighs. She does have a counterspell to interrupt which she will use if the rogue has used his kick.


ADAPTING TO THE CHALLENGE

So now that we know our team, let’s look at ourselves. You should keep in mind this is not a raid or a normal party. This challenge is going to require you to heal slightly different from what you might normally do. If you’ve been doing pvp as a mistweaver, this may be less new to you.

The biggest thing here is that you’re not going to use your normal soothing mist rotation, but spam Healing Spheres. They are cheaper, heal for a lot more and you can spam out two in a second. They are far superior over any other single target spell we have, so learn to love them. I don’t think it’s possible for us monks to do this without some Green Balls to love.

Considering the Proving Grounds scales down your gear to 463, you might want to stop and consider this a little bit. You’re going to end up with quite a lot of haste on your gear if you’re in your pve set, which will be completely wasted on this trial. Best to equip as much spirit and crit gear as you can, it will help. I’ve done this in my raiding gear with two mana trinkets that I had left from Throne of Thunder. You won’t run into major mana issues if you play smartly, but more spirit is nice to have in case you fall behind and need to pick up the pace. I normally run with a spirit flask and crit food, but you can take whatever you feel is lacking. Don’t think too much about the gear, this trial is more about preparation and calmness of mind than it is about gear.


TALENTS

talents

So let’s have a quick look at talents. In theory you can use whatever you like, but my own strategy relies on a couple of talents that I consider to be vital.
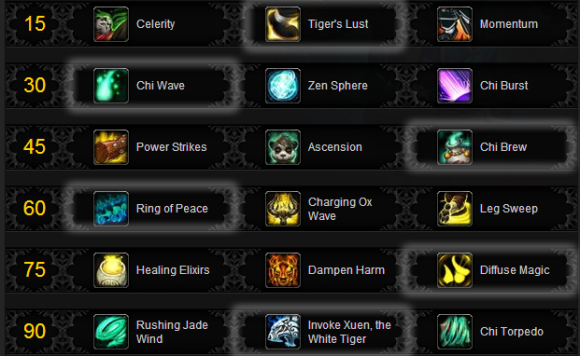
Tier 1 (lvl 15)
All is good. You’re going to need a speed boost a couple of times. I prefer Tiger’s Lust, but any will do really.

Tier 2 (lvl 30)
Again, any will do. I personally like Chi Wave more than the rest as it’s more bursty and will help burst down mobs, but that’s only a slight preference.

Tier 3 (lvl 45)
Chi Brew is going to be your main way of generating Chi. Chi means mana tea, so yeah. I suppose you could try it with another talent, but consider how insanely good Chi Brew is right now, I don’t see why you’d want to.

Tier 4 (lvl 60)
Ring of Peace is a talent I consider vital for wave 8. We’ll get to that in more detail later on. Another reason to take the disarm and silence over a stun is that the warrior already has a stun, so does the rogue. Diminishing returns makes Ring of Peace the better choice.

Tier 5 (lvl 75)
Diffuse Magic. It’s actually usefull and the rest isn’t in Proving Grounds for Healers.

Tier 6 (lvl 90)
Xuen. He’s the I-WIN button for us in Proving Grounds. His ability to cleave down mobs quickly and do insane healing gives you a speed boost and allows you to regen mana. Must Have.


GLYPHS

Glyph wise you can pretty much go with whatever you like. I used my normal raiding glyphs which did pretty much nothing in this little challenge, except for Glyph of Enduring Healing Sphere. I found this to be a handy one at times, but it’s a little luck based. The glyph allows your healing spheres (also the ones spawned by mastery) to stay around for 4 minutes total. The reason why this is handy is, because the entire team refuses to pick up your orbs. They are simply not programmed to look for them, which… come on Blizz! Even your npc’s don’t wanna stand in our mastery… change this silliness already! But I digress…

With the glyph they at least will last long enough to give you a free heal now and then as your partymembers run chaotically across the room. Also, it allows you to heal yourself for free as you will take damage now and then. It’s not much, but it’s something…


THE WAVES

WoWScrnShot_112613_191811

Ok so let’s get started with the tic tacs and start on the actual waves! Remember, there are only 10 waves that repeat for as long as you can handle them. Every wave, the mobs will do 1% more damage than they did in Gold. That means you’ll be facing 30% more damage at the end. You get a small break after every 10th for mana, so use it wisely.

WAVE 1

Endless starts off quite simple. Your goal here is to not waste any mana.  I pop Life Cocoon on the tank the minute he starts taking damage. This saves me a bunch of mana and I know I wont need it for the next few waves. Keep Chi Brew off cooldown so you keep generating those lovely teas.

Wave one consists of Large Flamecaller and 2 small rippers. The rogue and the mage will interrupt most of the flamecaller, but you can help out if you want. Easy wave.

WAVE 2

Quite an easy wave again, but if you don’t watch out you can fall behind on mana here. The Hive Singer can do a lot of AoE damage if not treated properly. As soon as the wave spawns, pop Xuen on the Singer. Let the rogue handle the first interrupt, then the mage will hopefully pick up the second. Use your own on the third and pop Ring of Peace on the tank or yourself for the fourth. By this time the mob should be close to dying and the cooldown of the rogues interrupt should be up. If he’s not dead yet, use your own interrupt again. If you used your interrupt before Ring of Peace, it should be up again. You can handle this wave with no AoE damage from the Singer if the rogue and mage don’t screw up.

The aqualyte is easy to handle, just dispell the Aqua Bombs asap. The small ripper poses no problem.

WAVE 3

Chomp time! This is where you’ll start to truly see the power of Healing Spheres. This wave has 2 tunnelers that leave a nasty DoT on your party members. If you marked up your party members, they are easier to find and drop some heals. Keep in mind that you have to be _above_ 90% health to drop the debuff, so that means 2-3 spheres in most cases.

take note though that in some tries, one party member might get targetted by both tunnelers, giving him a double chomp debuff. This means you need to react quickly or they will go down very quickly. All in all this wave is easy as our Healing Spheres are ideal for this debuff.

WAVE 4

Your first really nasty wave. Two Aqualytes and a Flamecaller. Your team will focus down the flamecaller first, meaning you’ll have to deal with 2 Aqua Bombs at the same time a couple of times. Since you can only dispell one, this can lead to some nasty nasty damage.

This is slightly luck based and also the time you start to generate a deep hatred for the mage who refuses to leave melee range. Here’s how to deal with this wave:

  • Keep an order in your mind: Tank, rogue/mage, hunter, you. That is the priority list of dispelling.
  • Keep in mind that the second bubble comes out a second after the first, so dont waste your dispell too quickly.
  • Use Diffuse magic on yourself if you get the bomb, so you can save your detox for another party member.
  • If your diffuse magic is off cooldown, just let the bomb on you explode and stay out of group range. Pick up some of the orbs that are lying about to save mana and heal yourself.
  • If you do get two bombs in melee range, for example on the tank and the rogue, you’re going to be in trouble. You can however pop Revival. It will dispell both bombs and can also top your group if you had a bad bomb situation before. This is a little tricky as you dont want to waste your revival too soon, but on the other hand, this can save you a ton of mana healing. Have a few goes to get a good feel about it.

All in all this wave is doable if you’re not extremely unlucky. Again, like chomp, sometimes both bombs go on one target, meaning you can get rid of them both with one dispell. Yay.

WAVE 5

Ok so if you’ve come out of wave 4 a bit shakey, prepare for some extra fun. Next up, you’ll be facing a large hive singer and a large conqueror. A bit into the wave, a tunneler will spawn to make things even worse. It’s easy to panic on this wave as the damage is quite high and spiky. Don’t. Trust in your healing spheres and everything will be allright. Just keep a good eye on Chi Brew and teas so you don’t spam yourself oom.

First deal with the hive singer as you’ve done in wave 2. Pop Xuen (he should be up or up soon), let the rogue and mage get interrupts on him, pop your own and use Ring of Peace. By the time the Singer is going down, you’ll see the Conqueror enlarge and hit your tank for much. This is the time the tunneler will be going around as well.

Pop Cocoon on the tank, heal up your Chomped friends and keep interrupting as best as you can. Cocoon and Shield Wall will keep the tank alive for quite some time. Make sure you don’t fall behind on Chomps and you’re going to be golden. As soon as the Singer goes down, it’s easy sailing really. You can manually disarm the conqueror if you want before his second enrage, but his damage is quite healable without it. Sometimes you get Chomp on the tank as the Conqueror enrages. This can be tricky, but again, Healing Spheres can heal through the damage.

WAVE 6

Six is a big wave and it spawns on the other side of the room. It consists of a Flamecaller, an Aqualyte, a tunneler and a Ripper and should pose no issue. Get to the flamecaller quick to interrupt the Lava Invokage and heal chomped people. This wave should give you little to no issues. Dispell the bombs and focus the tank as he’ll take some moderate damage.

WAVE 7

Pretty easy damage wave. Two small conquerors and a small hive singer. Handle the singer as usual. As he’s small, he will go down quickly. Keep Life Cocoon for the double enrage if you have to and spam spheres below the tank. This wave might seem nasty, but it’s really one of the easier ones and if done well, you should regen some mana at the end of this one.

WAVE 8

Wave 8 and 9 are the hardest waves, so you’re in for a treat. Xuen should be coming off cooldown by now and you should have Revival ready as well. Wave 8 is a funky wave as it consists of 4 Flamecallers and a ripper. The flamecallers are casters and can be quite nasty if not handled right.

This is what you do: roll in, pop Ring of Peace on yourself and silence them all. Run to the tank. This won’t work 100% of the time, but at least you’ll get them bunched up a little more and on the tank!

Pyroblasts are a pain and can either get your whole party low as they target random members, or get some insane burst on your tank. Be prepared to handle either. Once you have them bunched up, pop Xuen so you can cleave them down and handle the burst. You absolutely want to have this wave down before wave 9 starts. Fistweave and interrupt if you have to. Without Xuen this pack wont die before 9 spawns.

WAVE 9

Wave nine consists of 1 Large Hive Singer, a Tunneler and an Aqualyte. They spawn all the way on the other side of the room. This is a bit of an issue as the rogue won’t be able to shadowstep in and interrupt the Hive Singer. That means that if you don’t prepare, you’re facing two spells from the Singer and a roaming tunneler. That’s a lot of damage, especially in the later waves. If you’ve managed to clear wave 8 properly, you can run to the spawning area and take the first interrupt before the rogue manages to pop in. Get that Hive Singer under control and heal through the damage. You want to pop Xuen the moment the group spawns. You will not be able to handle all interrupts on this one, so there’s going to be some damage coming through. That’s ok. Let one or two pass, pop revival and Healing Sphere the chomps.

This wave is all about practice. It’s definitely doable, you just have to be prepared with your cooldowns.

WAVE 10

The last wave is actually quite easy. If you’ve managed to get past 8 and 9, this one should be no problem. You’re going to get a large Conqueror, a Flamecaller and an Aqualyte later on. The damage from the Conqueror can be scary, so if you’re low on mana pop Life Cocoon, disarm and things will be manageable. Dispell the bombs as normal and heal this out. If you’ve practiced on wave 9, you should be good on mana.

TO SUM THINGS UP…

WoWScrnShot_112613_190106

If you manage to get all these 10 waves down properly, without getting overwhelmed, you should have little issue getting the title. It’s just a matter of following your preparations, using your cooldowns wisely and not freaking out.
To sum things up:
1. Life Cocoon
2. Xuen
3. –
4. Diffuse Magic & Revival
5. Xuen, Life Cocoon
6. –
7. –
8. Ring of Peace, Life Cocoon
9. Xuen, Revival
10. –

Don’t forget to drink after wave 10 and enjoy your shiney new title 😉

PS. I almost forgot to add this little tip. Mark up your party members for easier dropping of Spheres!

Hellloooooooo!

Welcome to my blog. My name is Ribbed and this blog is going to be about playing World of Warcraft and the occasional Hearthstone stuff. I play a Mistweaver Monk in WoW who dabbles in the art of tanking now and then. I’m still messing about with the theme and getting stuff sorted. Should be posting things soon….